Nuxt3 で作った仕組みで Sony MESH に WebBluetooth API でステータス LED 操作するメモ

Nuxt3 で作った仕組みで Sony MESH に WebBluetooth API でステータス LED 操作するメモです。
背景
Nuxt3 で作った仕組みで Sony MESH に WebBluetooth API で接続するメモの、接続と切断をするだけの仕組みから、ブロック機能の有効化やステータス LED の操作をできる様にしています。
pages/index.vue 変更
で作成済みの環境です。前回 UI をつくった pages/index.vue を変更します。
<script setup lang="ts">

import { ref, onMounted } from 'vue'
import { BIconBluetooth } from 'bootstrap-icons-vue';

let service : any;
let device : any;

const currentStatus = ref('--')
const currentDeviceName = ref('--')
const currentDeviceID = ref('--')

// MESH Service UUID と Characteristics UUID
// https://developer.meshprj.com/hc/ja/articles/8286360648089-%E9%80%9A%E4%BF%A1%E4%BB%95%E6%A7%98%E3%81%AE%E6%A6%82%E8%A6%81
const serviceUuid = '72c90001-57a9-4d40-b746-534e22ec9f9e';
const characteristicUuid_Indicate = '72c90005-57a9-4d40-b746-534e22ec9f9e';
const characteristicUuid_Write = '72c90004-57a9-4d40-b746-534e22ec9f9e';
const characteristicUuid_WriteWithoutResponse = '72c90002-57a9-4d40-b746-534e22ec9f9e';
const characteristicUuid_Notify = '72c90003-57a9-4d40-b746-534e22ec9f9e';

let flagIndicated :boolean;
let characteristic_Write : any;

const getBLEConnect = async () => {
  try {

    // 名前で絞り込んだりサービス明示的に指定してフィルタしたり
    // https://developer.meshprj.com/hc/ja/articles/8286360648089-%E9%80%9A%E4%BF%A1%E4%BB%95%E6%A7%98%E3%81%AE%E6%A6%82%E8%A6%81
    // namePrefix は MESH-100 ではじまるデバイスで絞り込む
    // services で  Characteristics UUID を許可
    let options : any = {};
    options.filters = [
        {namePrefix: 'MESH-100'},
        {services: [
          characteristicUuid_Indicate,
          characteristicUuid_Write,
          characteristicUuid_WriteWithoutResponse,
          characteristicUuid_Notify
        ]}
    ];
    // optionalServices で MESH の Service UUID を許可
    options.optionalServices = [serviceUuid];

    console.log('Requesting Bluetooth Device...');

    // 初期化
    currentDeviceName.value = '--';
    currentDeviceID.value = '--';

    // Indicate の状態
    flagIndicated = false;

    // 接続開始
    device = await navigator.bluetooth.requestDevice(options);

    console.log('> Name: ' + device.name);
    console.log('> Id: ' + device.id);
    console.log('> Connected: ' + device.gatt.connected);

    currentDeviceName.value = device.name;
    currentDeviceID.value = device.id;

    console.log('Connecting to GATT Server...');
    currentStatus.value = 'Connecting to GATT Server...';
    const server = await device.gatt.connect();
    console.log(server);

    console.log('Getting Service...');
    currentStatus.value = 'Getting Service...';
    service = await server.getPrimaryService(serviceUuid);
    console.log(service);

    console.log('MESH Connected!');
    currentStatus.value = 'MESH Connected!';

    // Indicate、Notify の有効化
    //
    // 参考
    // https://googlechrome.github.io/samples/web-bluetooth/notifications.html
    // https://developer.meshprj.com/hc/ja/articles/8286377144729#h_01GBQDKSBPA60Z7557Z35V16MR
    // https://qiita.com/umi_kappa/items/45761c7454d5d4c10bf0

    // Indicate のイベントを待つ処理
    const characteristic_Indicate = await service.getCharacteristic(characteristicUuid_Indicate);
    await characteristic_Indicate.startNotifications();
    console.log('characteristic_Indicate.startNotifications');
    characteristic_Indicate.addEventListener('characteristicvaluechanged', handleIndicateNotifications);

    // Notification のイベントを待つ処理
    const characteristic_Notify = await service.getCharacteristic(characteristicUuid_Notify);
    await characteristic_Notify.startNotifications();
    console.log('characteristic_Notify.startNotifications');
    characteristic_Notify.addEventListener('characteristicvaluechanged', handleNotifyNotifications);

    // ブロック機能の有効化
    // 0x00020103 を送る。
    // Indicate イベントが来れば、いろいろと MESH にお願いができるようになる。
    //
    // 参考
    // 全部ブロック共通の処理
    // https://developer.meshprj.com/hc/ja/articles/8286379681945

    characteristic_Write = await service.getCharacteristic(characteristicUuid_Write);
    console.log('start characteristic_Write');
    console.log('ブロック機能の有効化');
    currentStatus.value = 'ブロック機能の有効化 Indicating...';
    characteristic_Write.writeValue(new Uint8Array([0x00,0x02,0x01,0x03]));
    console.log('wrote characteristic_Write');

  } catch (e){
      console.log('Error!');
      console.log(e);
      currentStatus.value = '[Error!] ' + e;
  }
}

const handleIndicateNotifications = async (event : any ) => {
  console.log('handleIndicateNotifications');
  // console.log(event);
  let value = event.target.value;
  const valueUint8Array = new Uint8Array(value.buffer)
  console.log(valueUint8Array);

  console.log('Indicate OK');
  currentStatus.value = 'Indicate OK! 操作可能!';
  flagIndicated = true;
};

const handleNotifyNotifications = async (event : any ) => {
  console.log('handleNotifyNotifications');
  // console.log(event);
  let value = event.target.value;
  const valueUint8Array = new Uint8Array(value.buffer)
  console.log(valueUint8Array);
};

// ステータスバーの点灯 赤
// https://developer.meshprj.com/hc/ja/articles/8286379681945#h_01GBQTH1222DGNRKQ1QCTHST11
const doStatusLED_RED = async () => {
  if(flagIndicated){
    characteristic_Write.writeValue(new Uint8Array([
      0x00,
      0x00,
      0x01,
      0x00,
      0x00,
      0x01,
      0x02
    ]));
  }
}

// ステータスバーの点灯 青
// https://developer.meshprj.com/hc/ja/articles/8286379681945#h_01GBQTH1222DGNRKQ1QCTHST11
const doStatusLED_BLUE = async () => {
  if(flagIndicated){
    characteristic_Write.writeValue(new Uint8Array([
      0x00,
      0x00,
      0x00,
      0x00,
      0x01,
      0x01,
      0x02
    ]));
  }
}

// ステータスバーの点灯 緑
// https://developer.meshprj.com/hc/ja/articles/8286379681945#h_01GBQTH1222DGNRKQ1QCTHST11
const doStatusLED_GREEN = async () => {
  if(flagIndicated){
    characteristic_Write.writeValue(new Uint8Array([
      0x00,
      0x00,
      0x00,
      0x01,
      0x00,
      0x01,
      0x02
    ]));
  }
}

// BLE の切断処理
const setBLEDisconnect = async () => {
  console.log('Disconnecting from Bluetooth Device...');
  currentStatus.value = 'Disconnecting from Bluetooth Device...';
  if (device.gatt.connected) {
      await device.gatt.disconnect();
      console.log('Disconnected');
      currentStatus.value = 'Disconnected!';
  } else {
      console.log('> Bluetooth Device is already disconnected');
  }
}

onMounted(() => {

})

</script>

<template>
  <div class="row">
    <div class="col">
      <h1>MESH Sample</h1>
    </div>
  </div>
  <div class="d-flex">
    <div class="p-2">
      <button type="button" class="btn btn-primary" @click="getBLEConnect"><BIconBluetooth /> 周辺の MESH デバイスを取得</button>
    </div>
    <div class="p-2">
      <button type="button" class="btn btn-secondary" @click="setBLEDisconnect">MESH デバイス切断</button>
    </div>
  </div>
  <div class="d-flex">
    <div class="p-2">

    </div>
  </div>
  <div class="d-flex">
    <div class="p-2">
      <button type="button" class="btn btn-secondary" @click="doStatusLED_RED">ステータス LED ON (赤)</button>
    </div>
  </div>
  <div class="d-flex">
    <div class="p-2">
      <button type="button" class="btn btn-secondary" @click="doStatusLED_BLUE">ステータス LED ON (青)</button>
    </div>
  </div>
  <div class="d-flex">
    <div class="p-2">
      <button type="button" class="btn btn-secondary" @click="doStatusLED_GREEN">ステータス LED ON (緑)</button>
    </div>
  </div>
</template>
前回の接続と切断をするだけの仕組みから、ブロック機能の有効化やステータス LED の操作をできる様にしています。
動かしてみる
npm run dev コマンドで開発サーバーを起動します。
もともとが Nuxt3 で Basic 認証と Bootstrap の環境をひとまず用意するメモ なので、Chrome ブラウザで表示すると Basic 認証を聞かれるので ID / PASS を入力してページを表示します。

うまく表示されました。今回はステータス LED の変更ボタンが、赤・青・緑があります。ということで、MESH の電源を入れて接続待ちにしてからデバイスを取得ボタンをクリック。
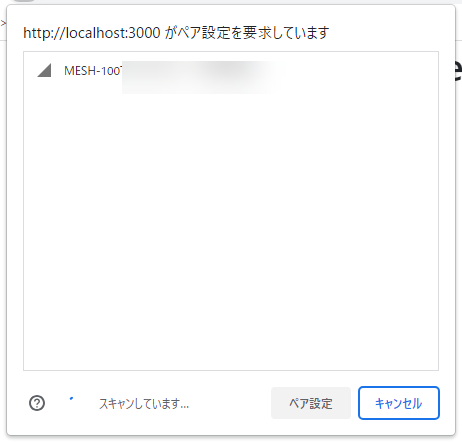
MESH のデバイス名の接頭語「MESH-100」で絞り込んだものが表示されています。
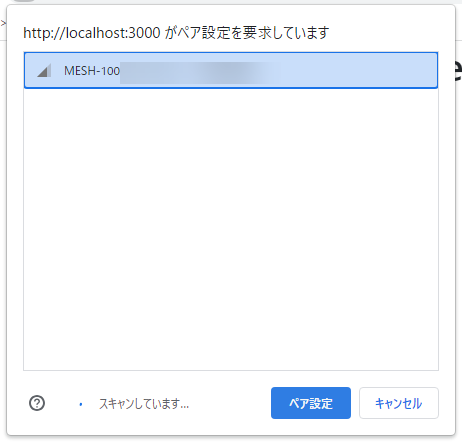
今回のつなぎたいデバイスをクリックしてペア設定をクリックします。

接続中でステータスが出ます。
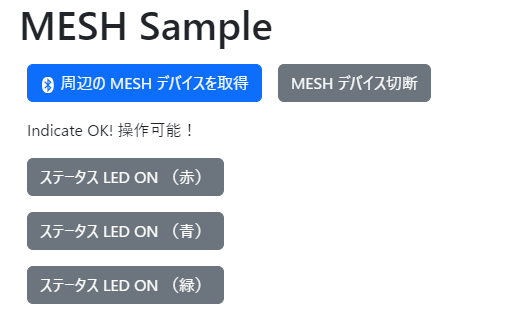
接続後のブロック機能の有効化も行って、Indicate まできて操作が可能になったようです!
赤ボタンをクリックします。
このように MESH のステータス LED が赤く点灯しました!
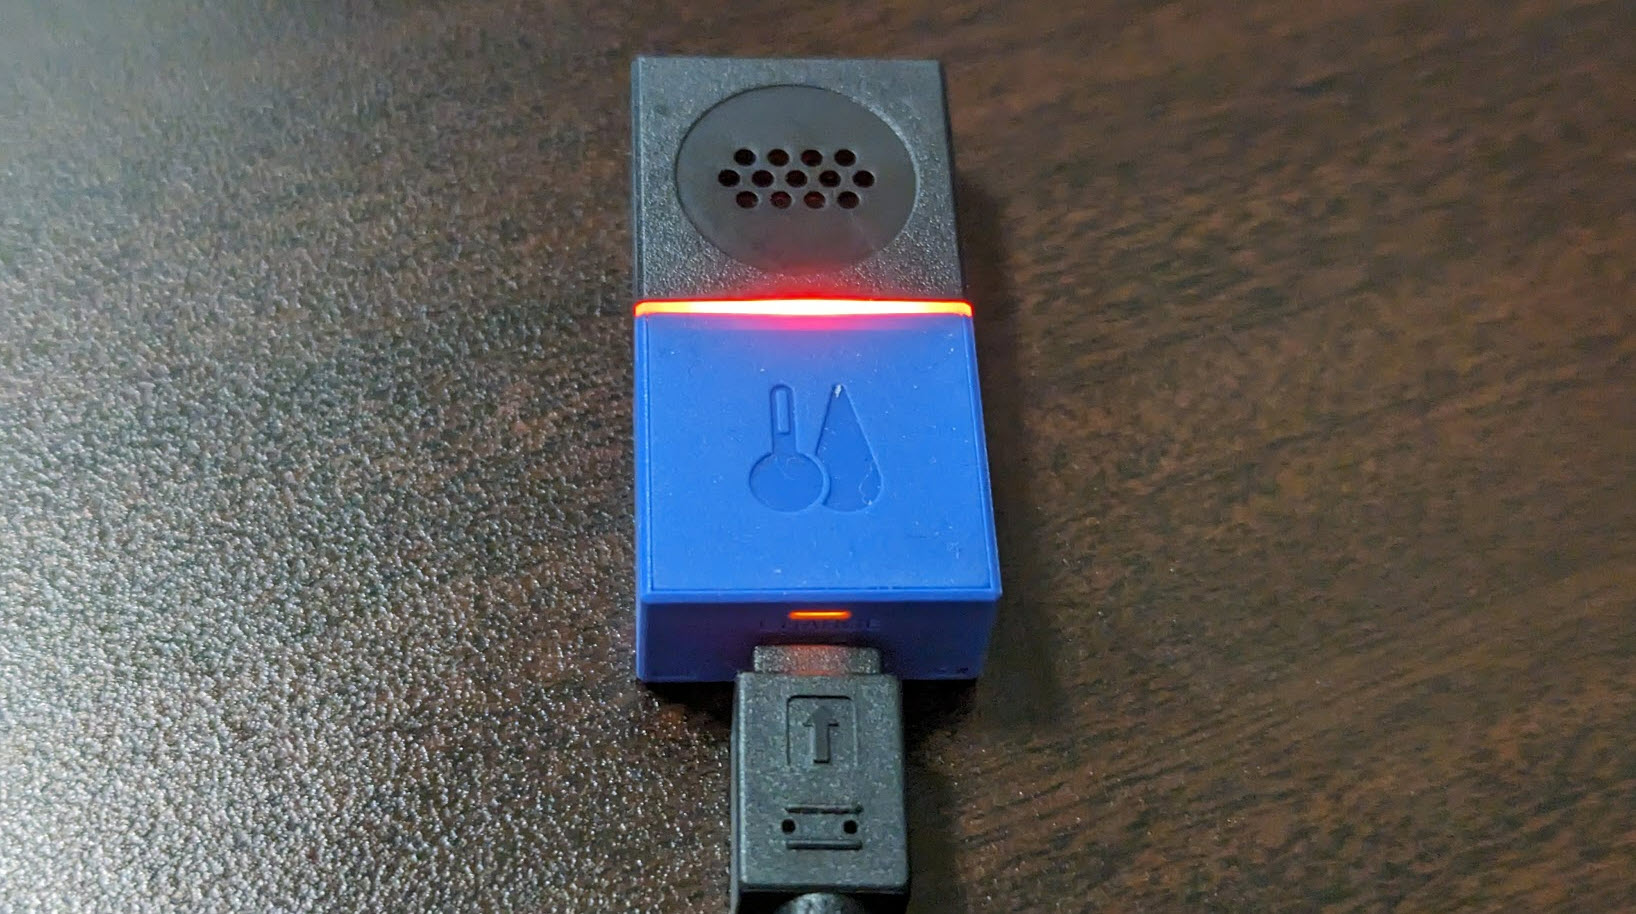
青ボタンをクリックします。
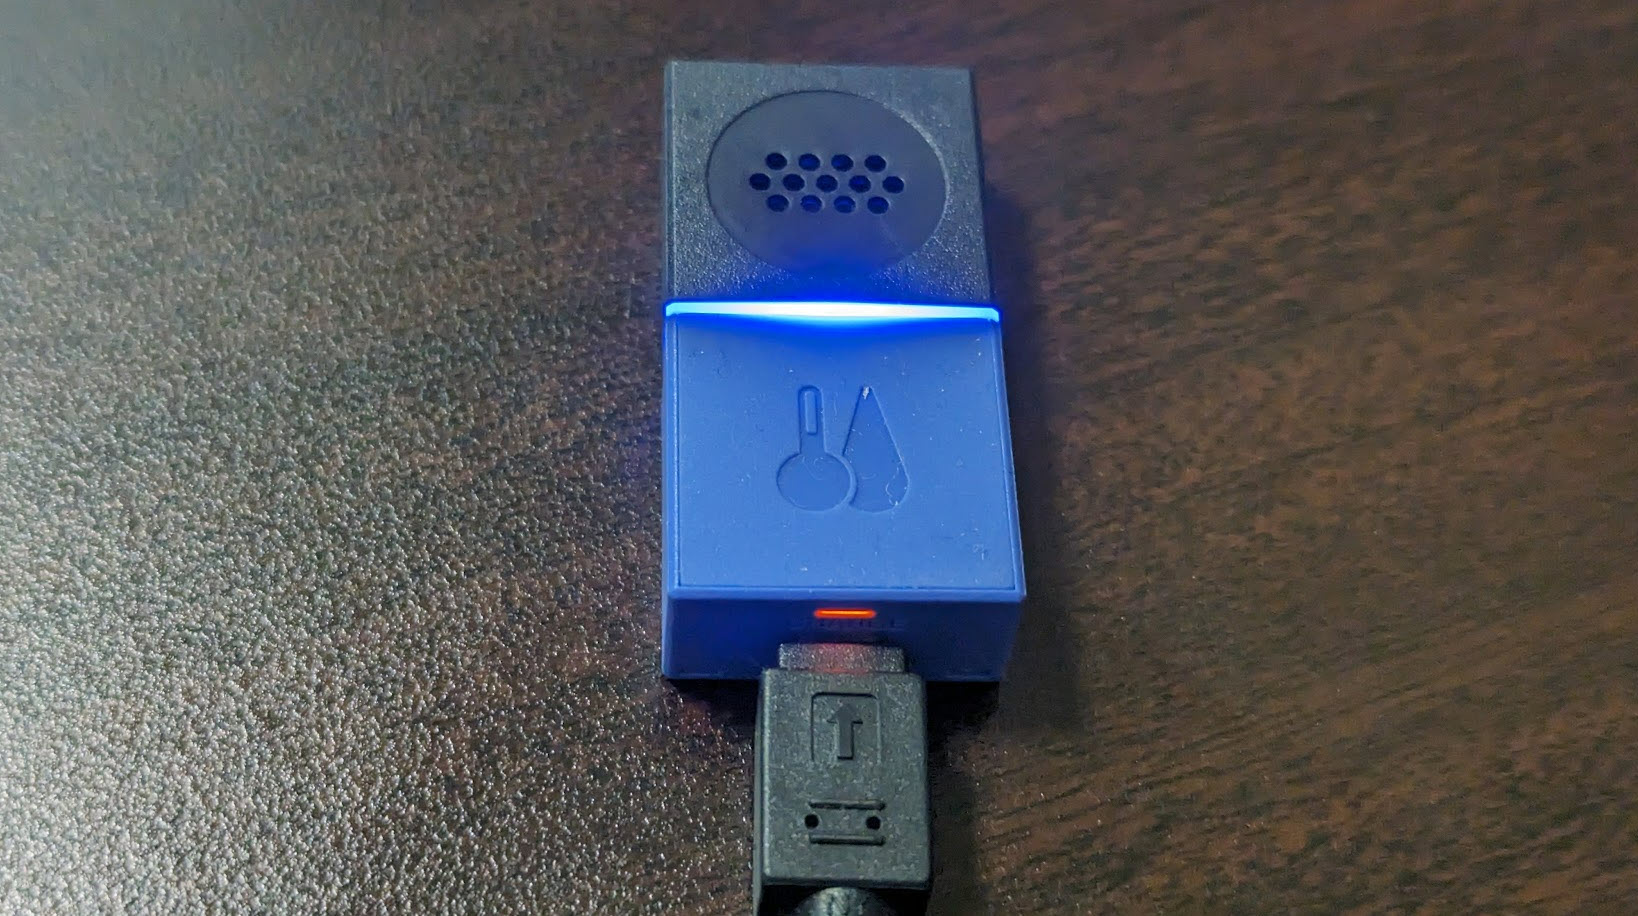
このように MESH のステータス LED が青く点灯しました!
緑ボタンをクリックします。
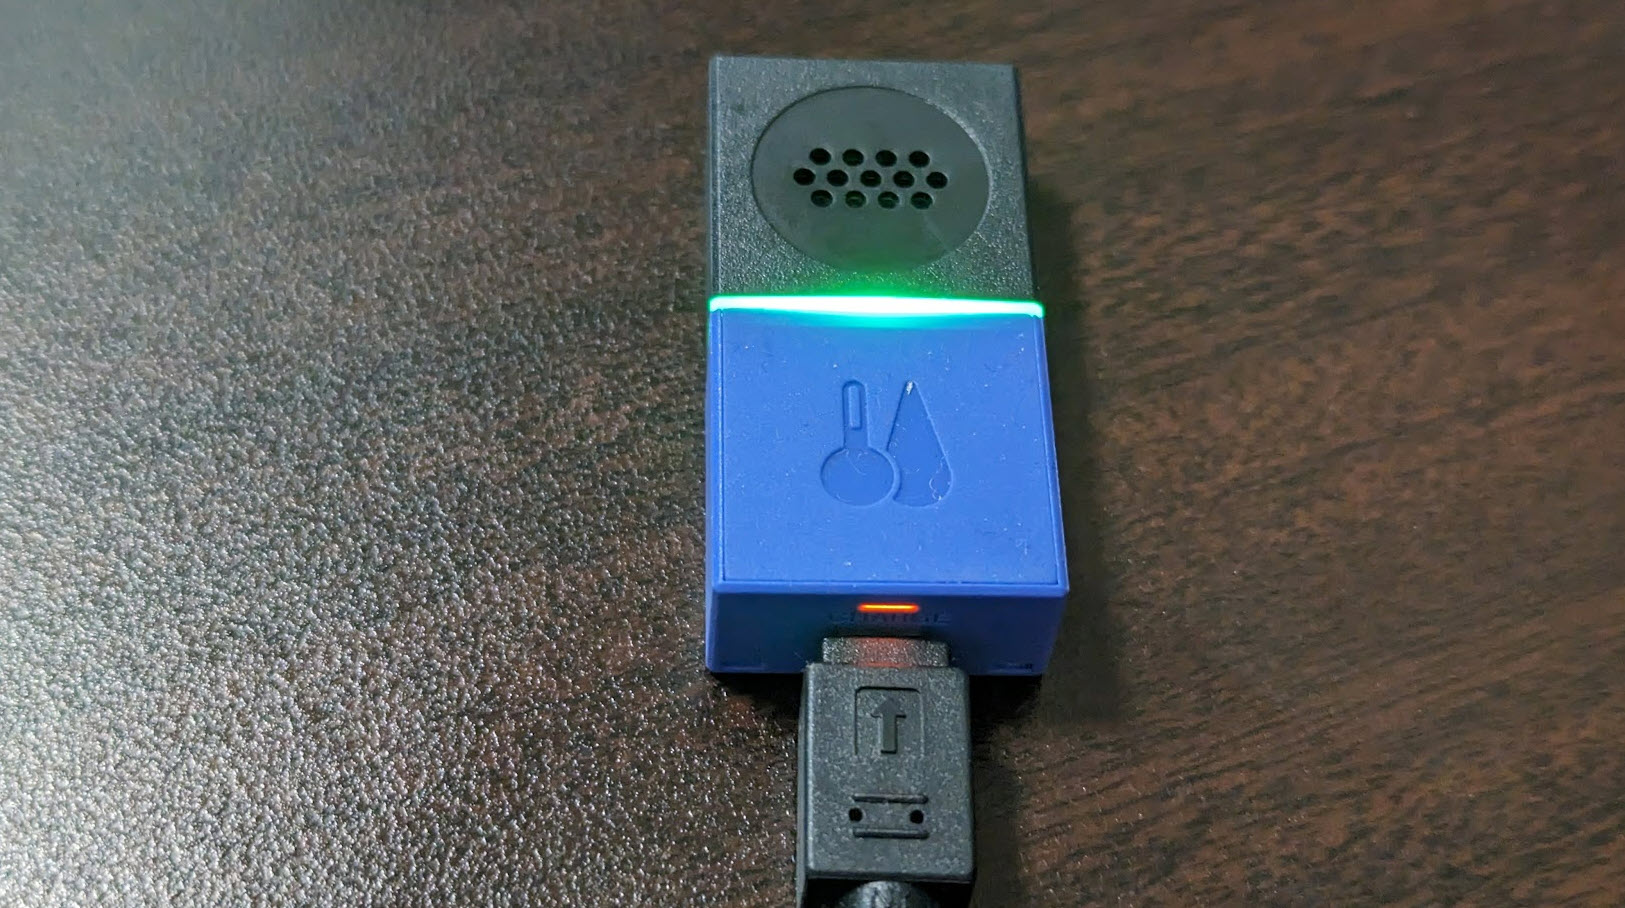
このように MESH のステータス LED が緑で点灯しました!