Nuxt3 で作った仕組みで Sony MESH に WebBluetooth API で接続するメモ

Nuxt3 で作った仕組みで Sony MESH に WebBluetooth API で接続するメモです。
背景
IoT の仕事で絡ませてもらっていると BLE で動く IoT デバイスの検証ツールを作る機会もあり、Vercel などで Basic 認証のような簡単な認証つきでサッと作れるとうれしいです。
そのあたりのナレッジをまとめておこうと思いまして、以前の Nuxt3 で Basic 認証と Bootstrap の環境をひとまず用意するメモ を元に、Nuxt3 で作った仕組みで Sony MESH に WebBluetooth API で接続してみました。
pages/index.vue 変更
Nuxt3 で Basic 認証と Bootstrap の環境をひとまず用意するメモで作成済みの環境です。Nuxt3 だと pages フォルダに入れれば自動的にルーティングも行ってくれるので、このまま、以下のように pages/index.vue を変更します。
<script setup lang="ts">

import { ref, onMounted } from 'vue'
import { BIconBluetooth } from 'bootstrap-icons-vue';

let service : any;
let device : any;

const currentStatus = ref('--')
const currentDeviceName = ref('--')
const currentDeviceID = ref('--')

// MESH Service UUID と Characteristics UUID
// https://developer.meshprj.com/hc/ja/articles/8286360648089-%E9%80%9A%E4%BF%A1%E4%BB%95%E6%A7%98%E3%81%AE%E6%A6%82%E8%A6%81
const serviceUuid = '72c90001-57a9-4d40-b746-534e22ec9f9e';
const characteristicUuid_Indicate = '72c90005-57a9-4d40-b746-534e22ec9f9e';
const characteristicUuid_Write = '72c90004-57a9-4d40-b746-534e22ec9f9e';
const characteristicUuid_WriteWithoutResponse = '72c90002-57a9-4d40-b746-534e22ec9f9e';
const characteristicUuid_Notify = '72c90003-57a9-4d40-b746-534e22ec9f9e';

const getBLEConnect = async () => {
  try {

    // 名前で絞り込んだりサービス明示的に指定してフィルタしたり
    // https://developer.meshprj.com/hc/ja/articles/8286360648089-%E9%80%9A%E4%BF%A1%E4%BB%95%E6%A7%98%E3%81%AE%E6%A6%82%E8%A6%81
    // namePrefix は MESH-100 ではじまるデバイスで絞り込む
    // services で  Characteristics UUID を許可
    let options : any = {};
    options.filters = [
        {namePrefix: 'MESH-100'},
        {services: [
          characteristicUuid_Indicate,
          characteristicUuid_Write,
          characteristicUuid_WriteWithoutResponse,
          characteristicUuid_Notify
        ]}
    ];
    // optionalServices で MESH の Service UUID を許可
    options.optionalServices = [serviceUuid];

    console.log('Requesting Bluetooth Device...');

    // 初期化
    currentDeviceName.value = '--';
    currentDeviceID.value = '--';

    device = await navigator.bluetooth.requestDevice(options);

    console.log('> Name: ' + device.name);
    console.log('> Id: ' + device.id);
    console.log('> Connected: ' + device.gatt.connected);

    currentDeviceName.value = device.name;
    currentDeviceID.value = device.id;

    console.log('Connecting to GATT Server...');
    currentStatus.value = 'Connecting to GATT Server...';
    const server = await device.gatt.connect();
    console.log(server);

    console.log('Getting Service...');
    currentStatus.value = 'Getting Service...';
    service = await server.getPrimaryService(serviceUuid);
    console.log(service);

    console.log('MESH Connected!');
    currentStatus.value = 'MESH Connected!';

  } catch (e){
      console.log('Error!');
      console.log(e);
      currentStatus.value = '[Error!] ' + e;
  }
}

const setBLEDisconnect = async () => {
  console.log('Disconnecting from Bluetooth Device...');
  currentStatus.value = 'Disconnecting from Bluetooth Device...';
  if (device.gatt.connected) {
      await device.gatt.disconnect();
      console.log('Disconnected');
      currentStatus.value = 'Disconnected!';
  } else {
      console.log('> Bluetooth Device is already disconnected');
  }
}

onMounted(() => {

})

</script>

<template>
  <div class="row">
    <div class="col">
      <h1>MESH Sample</h1>
    </div>
  </div>
  <div class="d-flex">
    <div class="p-2">
      <button type="button" class="btn btn-primary" @click="getBLEConnect"><BIconBluetooth /> 周辺の MESH デバイスを取得</button>
    </div>
    <div class="p-2">
      <button type="button" class="btn btn-secondary" @click="setBLEDisconnect">MESH デバイス切断</button>
    </div>
  </div>
  <div class="d-flex">
    <div class="p-2">

    </div>
  </div>
</template>
ひとまず、接続と切断をするだけの仕組みです。
動かしてみる
npm run dev コマンドで開発サーバーを起動します。Nuxt3 で Basic 認証と Bootstrap の環境をひとまず用意するメモ なので、Chrome ブラウザで表示すると Basic 認証を聞かれるので ID / PASS を入力してページを表示します。
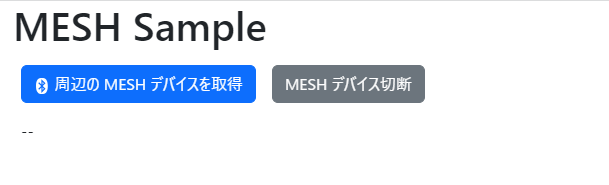
うまく表示されました。Bootstrap のデザインもうまく効いています。ということで、MESH の電源を入れて接続待ちにしてからデバイスを取得ボタンをクリック。
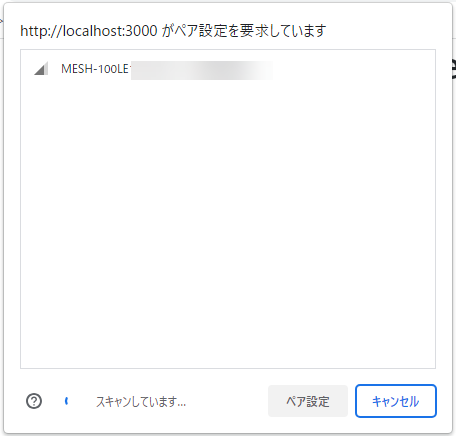
MESH のデバイス名の接頭語「MESH-100」で絞り込んだものが表示されています。
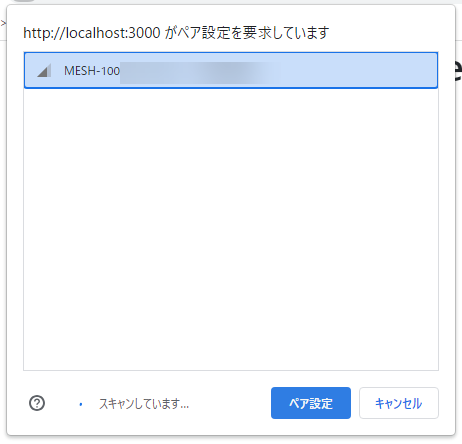
今回のつなぎたいデバイスをクリックしてペア設定をクリックします。

接続中でステータスが出ます。
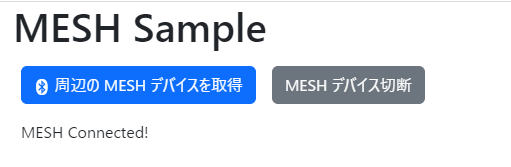
しばらく待つと、うまく接続されたようです!
今回はシンプルな接続のみですが、このような仕組みを Basic 認証と Bootstrap の良い感じの UI を含めてサッとつくれるので、結構いいなーと思って最近使ってみてます。
ひきつづき、細かな操作画面も作ってみようかと!