
トイドローン Tello をM5Stack+EAO 鍵スイッチで緊急着陸させるメモです。
今回の仕組み
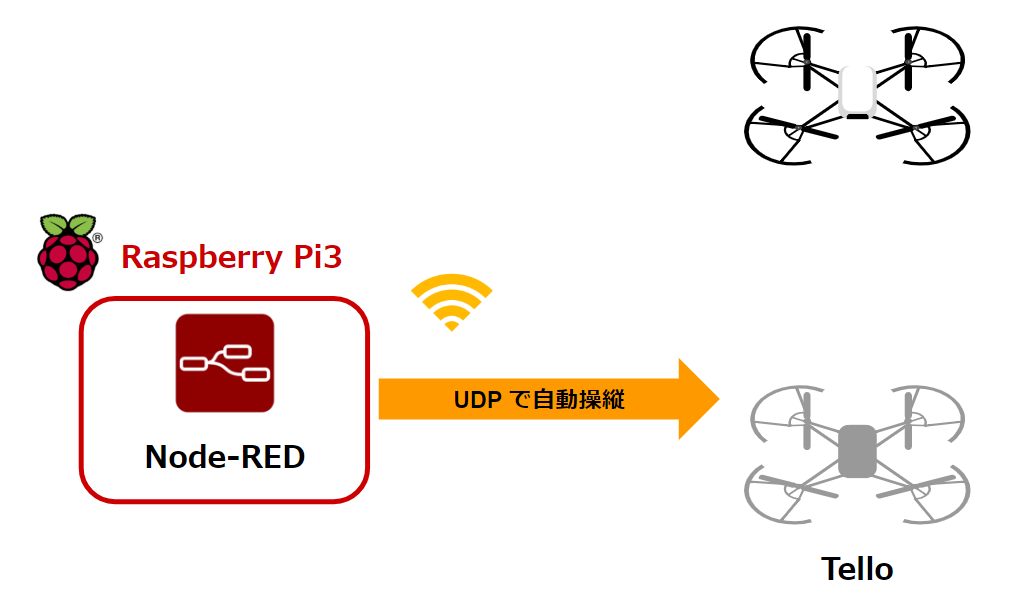
今回の仕組みとしては、他でTello操縦している状況をまず作ります。左右に揺れている感じです。
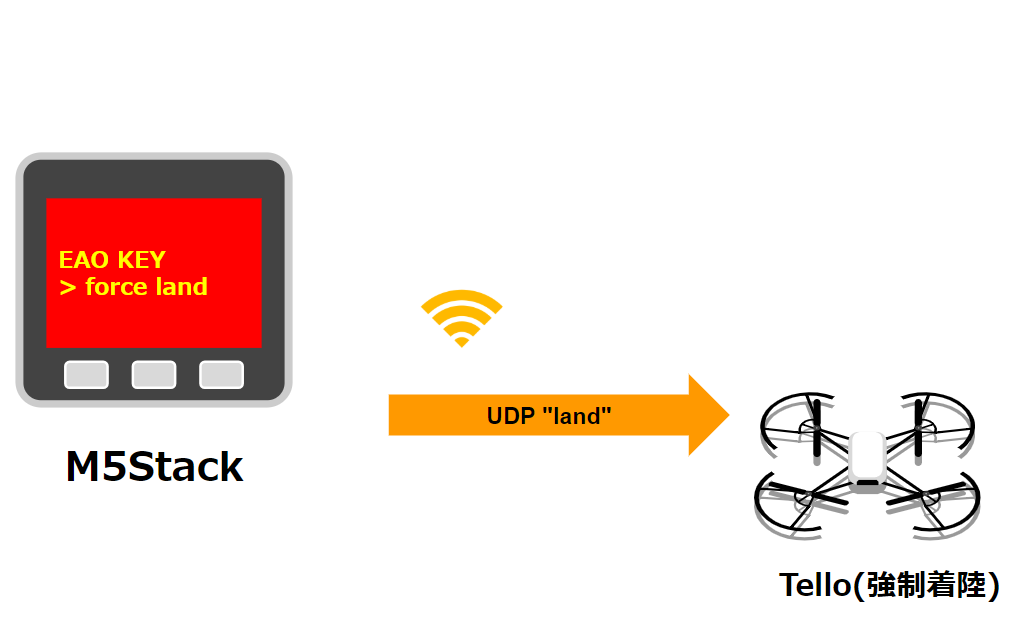
そのときに、M5Stack+EAO 鍵スイッチでUDPの着陸指示を出して強制着陸させます。
M5Stackソースコード
NefryBT(ESP32)でTelloを制御。1回だけ離陸して着陸する – Qiita
小型ドローンTelloの編隊飛行をESP32でやってみた : DJI Tello drone formation flight – Qiita
こちらを参考にして、以下のソースコードをM5Stackに書き込みます。
TELLO_SSID は自分のTelloのWi-Fi SSIDを入力します。
#include <WiFiUDP.h>
#include <M5Stack.h>

// TELLOのSSID
const char* TELLO_SSID = "TELLO-XXXXXX";  // 自分のTelloのWi-Fi SSIDを入力
// TELLOのIP
const char* TELLO_IP = "192.168.10.1";
// TELLO_PORT
const int PORT = 8889;

// ピン ON/OFF管理
int pinStateCurrent = LOW;
int pinState = LOW;
int connectPin = 2;

// UDPまわり
WiFiUDP Udp;
char packetBuffer[255];
String message = "";

void setup() {
    Serial.begin(115200);

    // Initialize the M5Stack object
    M5.begin();

    // EAO KEY INPUT_PULLUP
    pinMode(connectPin, INPUT_PULLUP);

    // START
    M5.Lcd.fillScreen(BLACK);
    M5.Lcd.setCursor(10, 10);
    M5.Lcd.setTextColor(WHITE);
    M5.Lcd.setTextSize(3);
    M5.Lcd.printf("TELLO START");

    // Start WiFi
    Serial.println("Connecting to ");
    Serial.print(TELLO_SSID);
    WiFi.begin(TELLO_SSID, "");

    // INFO
    M5.Lcd.setTextSize(2);
    M5.Lcd.setCursor(10, 100);
    M5.Lcd.printf("TELLO_SSID: ");
    M5.Lcd.println(TELLO_SSID);

    while (WiFi.status() != WL_CONNECTED) {
        delay(500);
        Serial.print(".");
    }

    // WiFi Connected
    Serial.println("");
    Serial.println("WiFi Connected.");
    M5.Lcd.setCursor(20, 130);
    M5.Lcd.setTextColor(WHITE);
    M5.Lcd.setTextSize(2);
    M5.Lcd.println("> WiFi Connected.");

    // UDP
    Udp.begin(PORT);

    sendMessage("command");
    message = listenMessage();
    Serial.println(":command");
    Serial.println(message);

    M5.Lcd.setCursor(20, 150);
    M5.Lcd.println("> Tello Commanded.");
}

void loop() {

  // buttonPin判定
  int pinStateCurrent = digitalRead(connectPin);
  if( pinStateCurrent != pinState){
    pinState = pinStateCurrent;
    if (pinState == HIGH) {
      Serial.println("ON");
      // テキスト反映
      M5.Lcd.fillScreen(RED);
      M5.Lcd.setCursor(10, 120);
      M5.Lcd.setTextColor(YELLOW);
      M5.Lcd.setTextSize(4);
      M5.Lcd.println("EAO KEY");
      M5.Lcd.println(" > force land");
      // 緊急着陸
      sendMessage("land");
      Serial.println(":land");
      message = listenMessage();
      Serial.println(message);
    } else {
      Serial.println("OFF");
      // テキスト反映
      M5.Lcd.fillScreen(BLACK);
      M5.Lcd.setCursor(10, 120);
      M5.Lcd.setTextColor(WHITE);
      M5.Lcd.setTextSize(4);
      M5.Lcd.println("EAO KEY");
      M5.Lcd.println(" > ----");
    }

    delay(1000);
  }

  if(M5.BtnA.wasPressed()) {

    M5.Lcd.fillScreen(GREEN);
    Serial.printf("wasPressed A \r\n");

    M5.Lcd.setCursor(10, 120);
    M5.Lcd.setTextColor(BLACK);
    M5.Lcd.setTextSize(4);
    M5.Lcd.println("Button A");
    M5.Lcd.println(" > takeoff");

    // 離陸
    sendMessage("takeoff");
    Serial.println(":takeoff");
    message = listenMessage();
    Serial.println(message);

    delay(1000);
  }

  if(M5.BtnB.wasPressed()) {

    M5.Lcd.fillScreen(BLUE);
    Serial.printf("wasPressed B \r\n");

    M5.Lcd.setCursor(10, 120);
    M5.Lcd.setTextColor(WHITE);
    M5.Lcd.setTextSize(4);
    M5.Lcd.println("Button B");
    M5.Lcd.println(" > land");

    // 着陸
    sendMessage("land");
    Serial.println(":land");
    message = listenMessage();
    Serial.println(message);

    delay(1000);
  }

  if(M5.BtnC.wasPressed()) {
    // M5.Lcd.printf("wasPressed C \r\n");

    M5.Lcd.fillScreen(BLACK);
    Serial.printf("wasPressed C \r\n");

    M5.Lcd.setCursor(10, 120);
    M5.Lcd.setTextColor(WHITE);
    M5.Lcd.setTextSize(4);
    M5.Lcd.println("Button C");
    M5.Lcd.println(" > command");

    // command
    sendMessage("command");
    message = listenMessage();
    Serial.println(":command");
    Serial.println(message);

    delay(1000);
  }

  M5.update();
}

// Tello <- UDP
String listenMessage() {
  int packetSize = Udp.parsePacket();
  if (packetSize) {
    Serial.print("Received packet of size ");
    Serial.println(packetSize);
    Serial.print("From ");
    IPAddress remoteIp = Udp.remoteIP();
    Serial.print(remoteIp);
    Serial.print(", port ");
    Serial.println(Udp.remotePort());

    // read the packet into packetBufffer
    int len = Udp.read(packetBuffer, 255);
    if (len > 0) {
      packetBuffer[len] = 0;
    }
    Serial.println("Contents:");
    Serial.println(packetBuffer);
  }
  // this only works as tello's API doesn't return responses greater than 255 char
  return (char*) packetBuffer;
}

// Tello -> UDP

void sendMessage(char* ReplyBuffer) {
  Udp.beginPacket(TELLO_IP, PORT);
  Udp.printf(ReplyBuffer);
  Udp.endPacket();
}
M5StackをEAO 鍵スイッチにつなげる
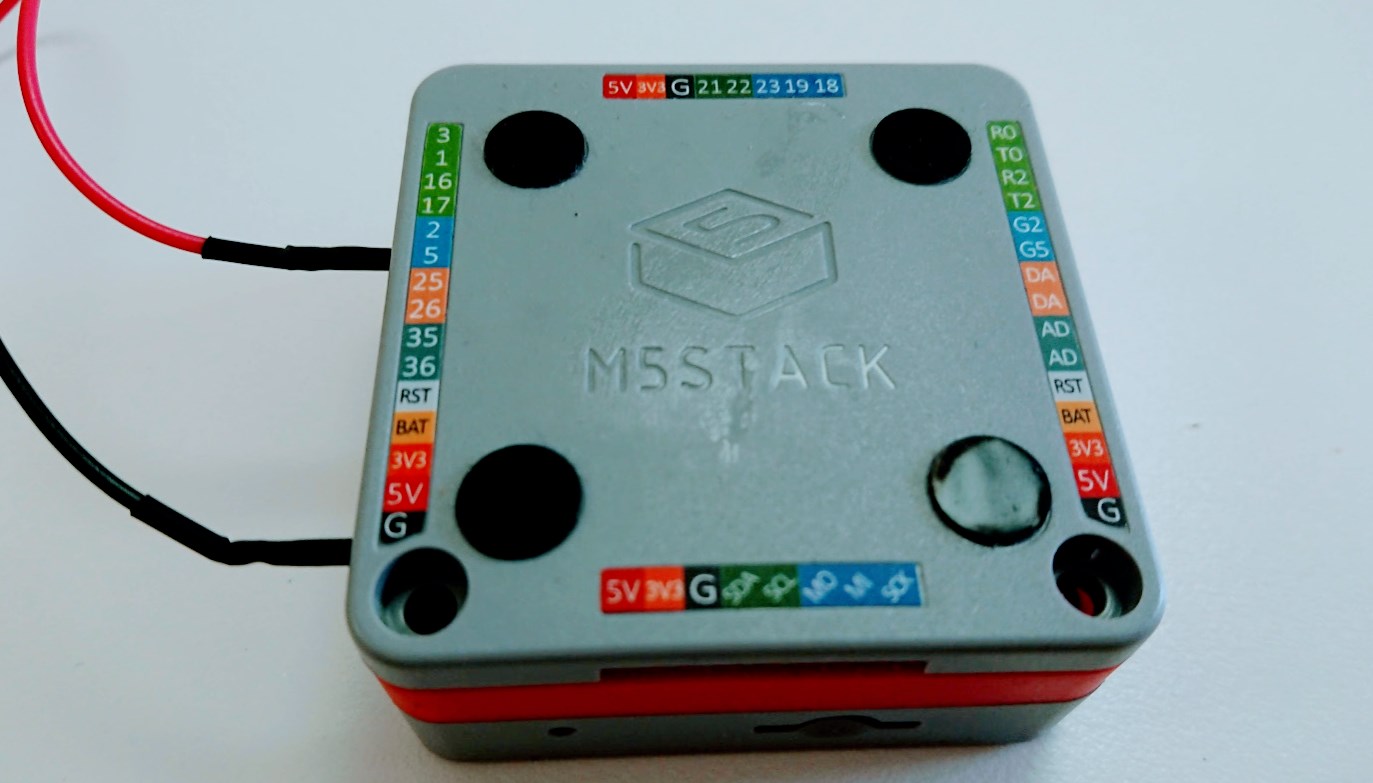
GPIO 2番とGNDにつなげます。
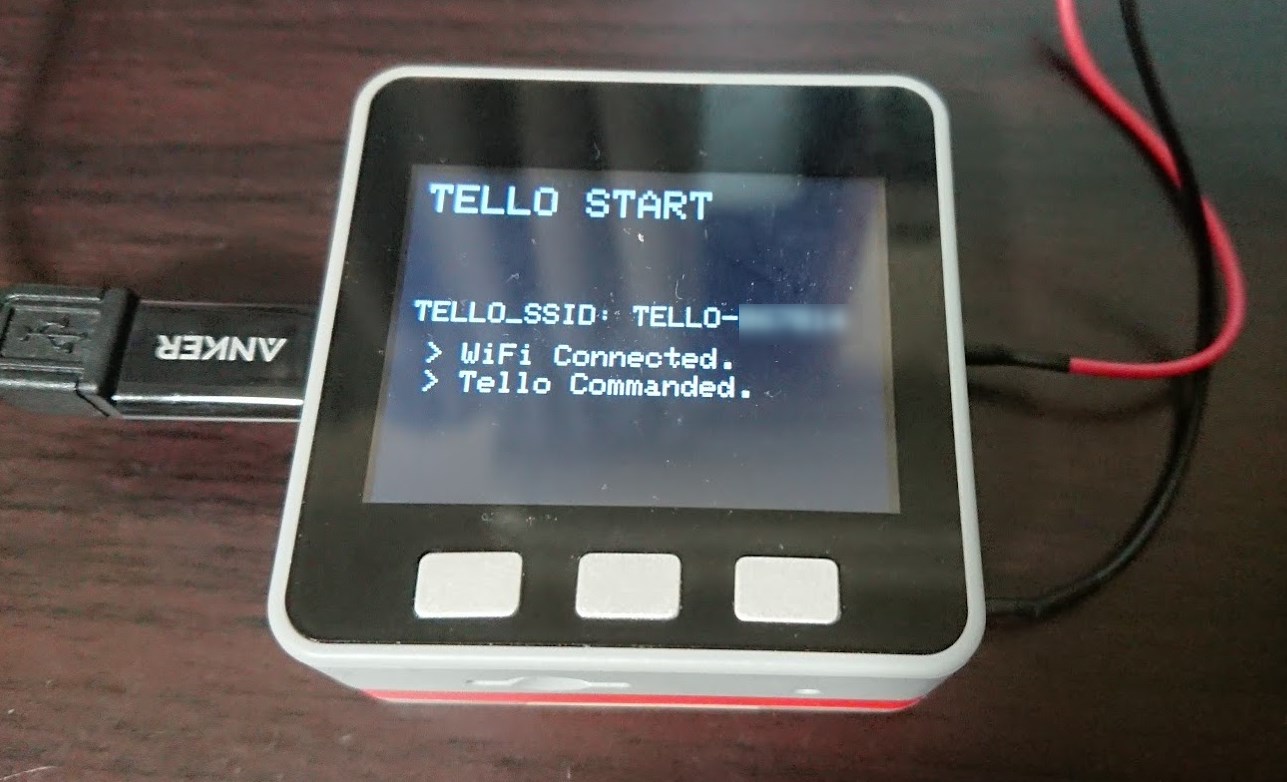
起動すると自分のTelloのWi-Fi につながります。

起動時はおそらくOFFの状態です。
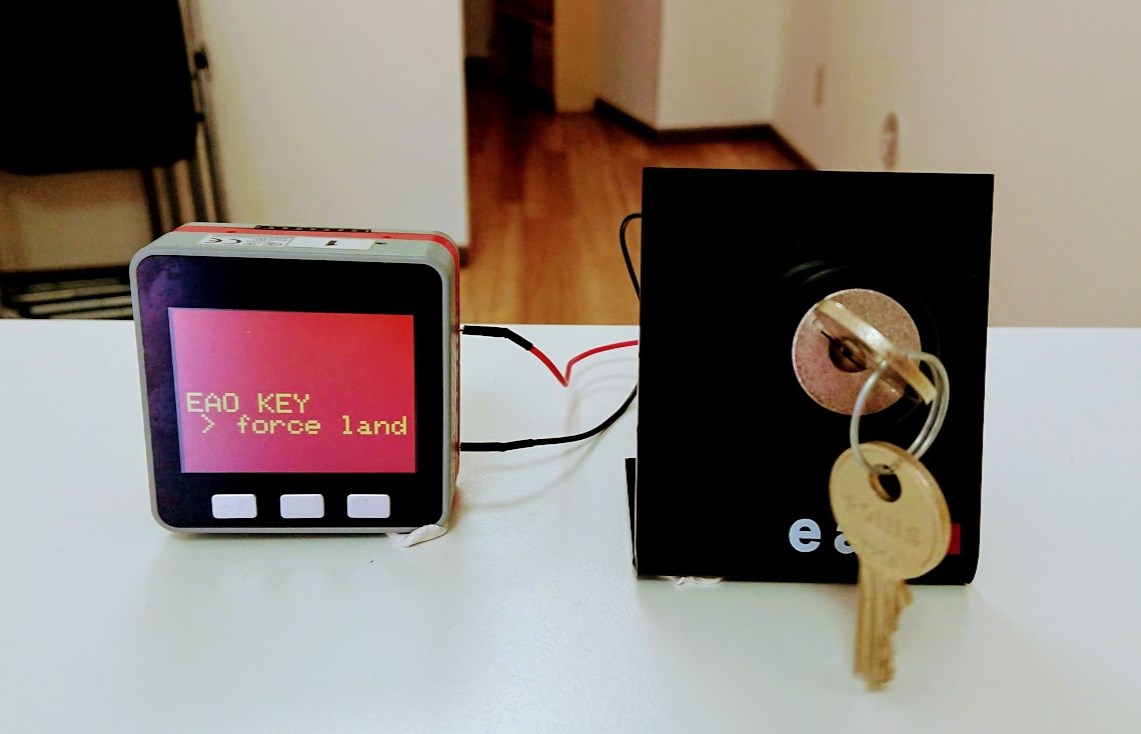
キーを回すとこのような表示でTelloに着陸の動作を命令します。
実際に動かしてみる
ということで実際に強制的に割り込めるかやってみましょう!
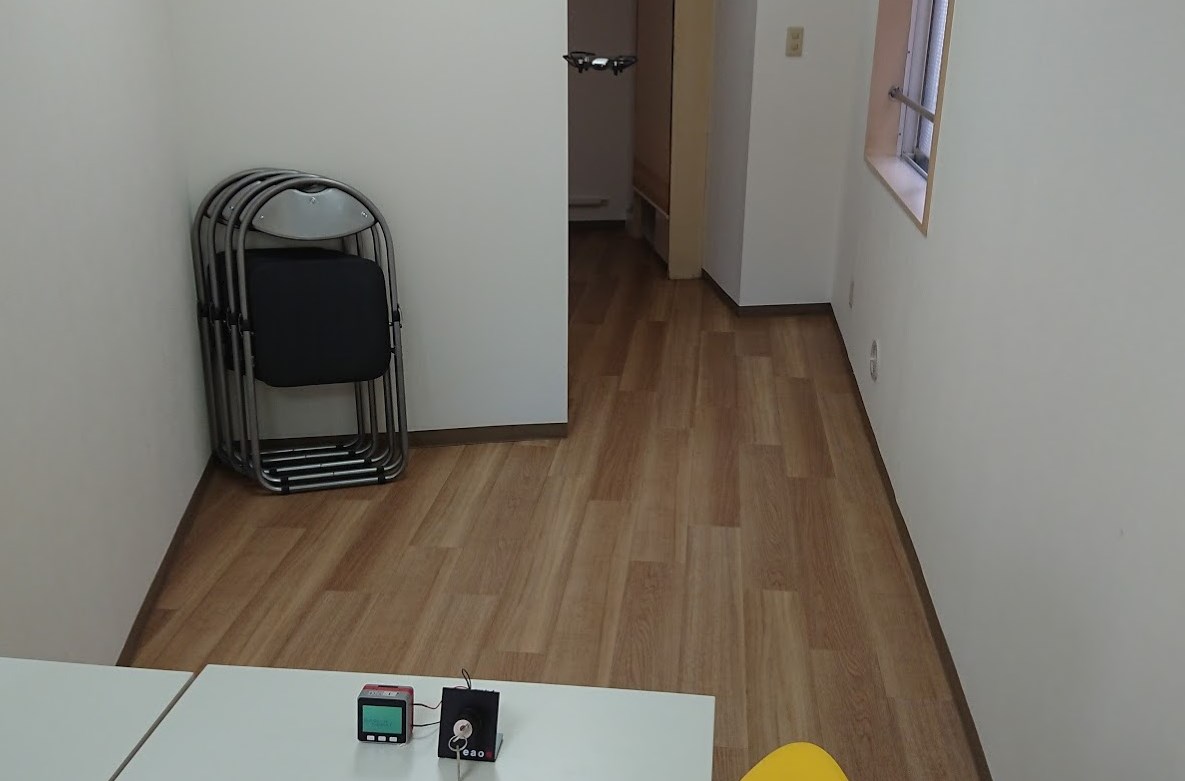
まず別ルートでNode-REDで飛翔させてプログラム制御しておきます。左右に飛行しております。
EAO 鍵スイッチを動作させてみると、無事に着陸できました!
ふりかえる
ということで、トイドローン Tello をM5Stack+EAO 鍵スイッチで緊急着陸させることができました。
なぜ、これをやってみたかったかというと、まずTelloの操作が command 司令を出したあとにさらに割り込みができるのかを試したかったことがスタートです。
そして、EAO 鍵スイッチをIoT化してみて感じた一番の有用性というのは、実は「鍵を持った人だけ特別な動作ができる」ということなので、これをドローン上で簡易的だとしても試してみたかったというところも試したかったところもあります。
実際にやってみて狙い通りアナログの鍵ならではの、鍵を持った人のみが緊急着陸させるというセキュアな状況をつくれました。
これはいろいろと応用がききそうですね。
それでは、よき、 M5Stack & Tello & EAO Lifeを!