Unity からマイク録音して音データを WAV フォーマットに保存するメモ

Unity からマイク録音して音データを WAV フォーマットに保存するメモです。
実装できるまでの知見あつめ
いろいろとやりたいことがあり Unity からマイク録音した音データを WAV フォーマットにしたかったのですが、なんとかできました。
Unityで録音して、録音したサウンドを再生する最小実装 - Qiita
AudioClip や Microphone まわりで録音した音データの知見はうまく実装できました。
【Unity】AudioClipからWAVEファイルを生成する - はなちるのマイノート
WAV データに関しては、ほんとこちらの記事に助けられました。もちろん、ほかの記事も参考にはなったのですが、私にとってはやや断片的で小さな知見同士をつなげるところが大変でしたが、この記事の、
- WAV フォーマットの理解
- AudioClip から音データ取得する流れ
- 音データのバイト列を WAV フォーマットにする流れ
あたりがつながって理解できたところがよかったです。また、 HoloLens ではないのですが、いずれデバイスでなんとかするところで、
の記事も知見がまとまってから出会うことができ、知見の補強ができました。感謝です。
Unity で Cube を準備
Unity で以下のように Cube を準備します。ほか EventSystem やカメラに Physics Raycaster を仕込んでいる状態で、クリックすれば動作する状態です。

プログラム
Cube に以下のように CubeEvent.cs を割り当てます。
using UnityEngine;
using UnityEngine.EventSystems;
using System;
using System.IO;
using System.Text;

public class CubeEvent : MonoBehaviour, IPointerClickHandler
{
    // マイクの開始・終了管理
    bool flagMicRecordStart = false;

    // マイクデバイスがキャッチできたかどうか
    bool catchedMicDevice = false;

    // 現在録音するマイクデバイス名
    string currentRecordingMicDeviceName = "null";

    // 録音のターゲットになるマイクデバイス名
    // これはお使いのデバイスで変わります
    // 完全一致でないと受け取れないので注意
    string recordingTargetMicDeviceName = "Krisp Microphone (Krisp Audio)";

    // ヘッダーサイズ
    int HeaderByteSize = 44;

    // BitsPerSample
    int BitsPerSample = 16;

    // AudioFormat
    int AudioFormat = 1;

    // 録音する AudioClip
    AudioClip recordedAudioClip;

    // サンプリング周波数
    int samplingFrequency = 44100;

    // 最大録音時間[sec]
    int maxTimeSeconds = 10;

    // Wav データ
    byte[] dataWav;

    void Start()
    {
        catchedMicDevice = false;

        Launch();
    }

    void Launch()
    {

        // マイクデバイスを探す
        foreach (string device in Microphone.devices)
        {
            Debug.Log($"Mic device name : {device}");

            // PC 用のマイクデバイスを割り当て
            if (device == recordingTargetMicDeviceName)
            {
                Debug.Log($"{recordingTargetMicDeviceName} searched");

                currentRecordingMicDeviceName = device;

                catchedMicDevice = true;
            }

        }

        if (catchedMicDevice)
        {
            Debug.Log($"マイク捜索成功");
            Debug.Log($"currentRecordingMicDeviceName : {currentRecordingMicDeviceName}");
        } else
        {
            Debug.Log($"マイク捜索失敗");
        }


    }

    void Update()
    {

    }

    void RecordStart()
    {
        // マイクの録音を開始して AudioClip を割り当て
        recordedAudioClip = Microphone.Start(currentRecordingMicDeviceName, false, maxTimeSeconds, samplingFrequency);
    }

    void RecordStop()
    {
        // マイクの停止
        Microphone.End(currentRecordingMicDeviceName);

        Debug.Log($"WAV データ作成開始");

        // using を使ってメモリ開放を自動で行う
        using (MemoryStream currentMemoryStream = new MemoryStream())
        {
            // ChunkID RIFF
            byte[] bufRIFF = Encoding.ASCII.GetBytes("RIFF");
            currentMemoryStream.Write(bufRIFF, 0, bufRIFF.Length);

            // ChunkSize
            byte[] bufChunkSize = BitConverter.GetBytes((UInt32)(HeaderByteSize + recordedAudioClip.samples * recordedAudioClip.channels * BitsPerSample / 8));
            currentMemoryStream.Write(bufChunkSize, 0, bufChunkSize.Length);

            // Format WAVE
            byte[] bufFormatWAVE = Encoding.ASCII.GetBytes("WAVE");
            currentMemoryStream.Write(bufFormatWAVE, 0, bufFormatWAVE.Length);

            // Subchunk1ID fmt
            byte[] bufSubchunk1ID = Encoding.ASCII.GetBytes("fmt ");
            currentMemoryStream.Write(bufSubchunk1ID, 0, bufSubchunk1ID.Length);

            // Subchunk1Size (16 for PCM)
            byte[] bufSubchunk1Size = BitConverter.GetBytes((UInt32)16);
            currentMemoryStream.Write(bufSubchunk1Size, 0, bufSubchunk1Size.Length);

            // AudioFormat (PCM=1)
            byte[] bufAudioFormat = BitConverter.GetBytes((UInt16)AudioFormat);
            currentMemoryStream.Write(bufAudioFormat, 0, bufAudioFormat.Length);

            // NumChannels
            byte[] bufNumChannels = BitConverter.GetBytes((UInt16)recordedAudioClip.channels);
            currentMemoryStream.Write(bufNumChannels, 0, bufNumChannels.Length);

            // SampleRate
            byte[] bufSampleRate = BitConverter.GetBytes((UInt32)recordedAudioClip.frequency);
            currentMemoryStream.Write(bufSampleRate, 0, bufSampleRate.Length);

            // ByteRate (=SampleRate * NumChannels * BitsPerSample/8)
            byte[] bufByteRate = BitConverter.GetBytes((UInt32)(recordedAudioClip.samples * recordedAudioClip.channels * BitsPerSample / 8));
            currentMemoryStream.Write(bufByteRate, 0, bufByteRate.Length);

            // BlockAlign (=NumChannels * BitsPerSample/8)
            byte[] bufBlockAlign = BitConverter.GetBytes((UInt16)(recordedAudioClip.channels * BitsPerSample / 8));
            currentMemoryStream.Write(bufBlockAlign, 0, bufBlockAlign.Length);

            // BitsPerSample
            byte[] bufBitsPerSample = BitConverter.GetBytes((UInt16)BitsPerSample);
            currentMemoryStream.Write(bufBitsPerSample, 0, bufBitsPerSample.Length);

            // Subchunk2ID data
            byte[] bufSubchunk2ID = Encoding.ASCII.GetBytes("data");
            currentMemoryStream.Write(bufSubchunk2ID, 0, bufSubchunk2ID.Length);

            // Subchuk2Size
            byte[] bufSubchuk2Size = BitConverter.GetBytes((UInt32)(recordedAudioClip.samples * recordedAudioClip.channels * BitsPerSample / 8));
            currentMemoryStream.Write(bufSubchuk2Size, 0, bufSubchuk2Size.Length);

            // Data
            float[] floatData = new float[recordedAudioClip.samples * recordedAudioClip.channels];
            recordedAudioClip.GetData(floatData, 0);

            foreach (float f in floatData)
            {
                byte[] bufData = BitConverter.GetBytes((short)(f * short.MaxValue));
                currentMemoryStream.Write(bufData, 0, bufData.Length);
            }

            Debug.Log($"WAV データ作成完了");

            dataWav = currentMemoryStream.ToArray();

            Debug.Log($"dataWav.Length {dataWav.Length}");

            // 検証用にファイル保存
            // Assets/record.wav に保存されます
            string pathSaveWav = Path.Combine(Application.dataPath, "record.wav");

            // using を使ってメモリ開放を自動で行う
            using (FileStream currentFileStream = new FileStream(pathSaveWav, FileMode.Create))
            {
                currentFileStream.Write(dataWav, 0, dataWav.Length);

                Debug.Log($"保存完了 path : {pathSaveWav}");
            }

        }

    }

    public void OnPointerClick(PointerEventData eventData)
    {
        if (catchedMicDevice)
        {
            if (flagMicRecordStart)
            {
                // Stop
                flagMicRecordStart = false;
                Debug.Log($"Mic Record Stop");

                RecordStop();

            }
            else
            {
                // Start
                flagMicRecordStart = true;
                Debug.Log($"Mic Record Start");

                RecordStart();
            }
        }

    }


}
いろいろと実装で苦労した点をメモしておきます。
void Launch()
    {

        // マイクデバイスを探す
        foreach (string device in Microphone.devices)
        {
            Debug.Log($"Mic device name : {device}");

            // PC 用のマイクデバイスを割り当て
            if (device == recordingTargetMicDeviceName)
            {
                Debug.Log($"{recordingTargetMicDeviceName} searched");

                currentRecordingMicDeviceName = device;

                catchedMicDevice = true;
            }

        }

        if (catchedMicDevice)
        {
            Debug.Log($"マイク捜索成功");
            Debug.Log($"currentRecordingMicDeviceName : {currentRecordingMicDeviceName}");
        } else
        {
            Debug.Log($"マイク捜索失敗");
        }


    }
ここでマイクを捜索しているのですが、当たり前ですが、マイク名が完全一致しないとターゲットにできません。たとえば、私の PC の場合「マイク配列 (Realtek High Definition Audio(SST))」というものがあるのですが、マイク配列という文言は必要ないと思ってしまって、最初外していたらうまく認識されませんでした。
なので、一度マイクの名前がわからなくてもとりあえず実行してみてマイク名を把握しておくのがよさそうです。
// using を使ってメモリ開放を自動で行う
        using (MemoryStream currentMemoryStream = new MemoryStream())
        {
いろいろな先行のサンプルを見ていると using の記述がありましたが オブジェクトの破棄(C#) - 超初心者向けプログラミング入門 にあるとおり、うまくオブジェクトを使用し終えたら破棄してくれるもののようです。こういう録音のようにメモリを消費しやすいものでは、とても便利な機能と気づけたので、私のものにも導入しています。
// ChunkID RIFF
            byte[] bufRIFF = Encoding.ASCII.GetBytes("RIFF");
            currentMemoryStream.Write(bufRIFF, 0, bufRIFF.Length);
【Unity】AudioClipからWAVEファイルを生成する - はなちるのマイノート のコードの流れがとても参考になったのですが、MemoryStream.Write メソッド (System.IO) | Microsoft Learn のとおり、どうも Write の場合は第二引数に offset と第三引数に count が必須だったので、そのようにしました。結構、ここを理解してちゃんと書くあたりで、試行錯誤はありました。バイト列いつもこわい。
Debug.Log($"WAV データ作成完了");

            dataWav = currentMemoryStream.ToArray();

            Debug.Log($"dataWav.Length {dataWav.Length}");

            // 検証用にファイル保存
            // Assets/record.wav に保存されます
            string pathSaveWav = Path.Combine(Application.dataPath, "record.wav");

            // using を使ってメモリ開放を自動で行う
            using (FileStream currentFileStream = new FileStream(pathSaveWav, FileMode.Create))
            {
                currentFileStream.Write(dataWav, 0, dataWav.Length);

                Debug.Log($"保存完了 path : {pathSaveWav}");
            }
この最後の保存する部分ですが、あえてこうしています。いろいろなサンプルを見ていたら FileStream を使って WAV データを作成して、どこかにファイル保存していました。
私の場合は、用途として保存はせず、そのままバイト列をどこかに送りたかったので MemoryStream でメモリ上でデータを作っています。
そして WAV フォーマットで正しく作成できているかの確認はしたかったので、別途 FileStream をつくり、そこに MemoryStream で作成済みのデータを外部に保存するようにして確認できるようにしています。
動かしてみる
ここまで設定できたら、Play ボタンを押して動かしてみます。
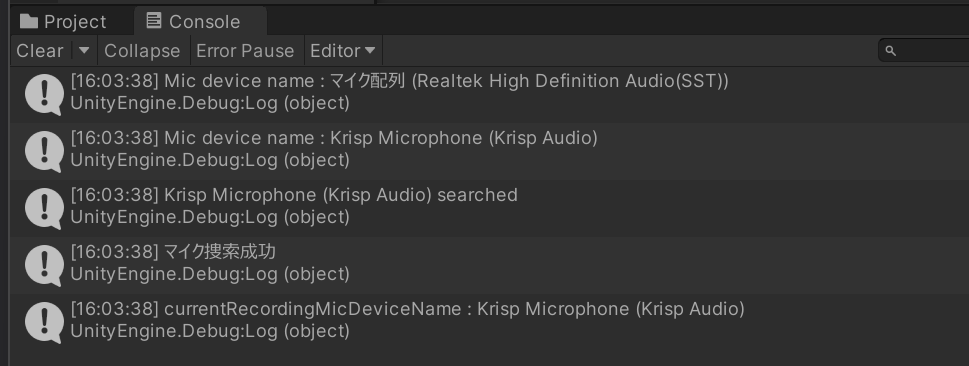
まず、マイクデバイスを捜索して値が一致するものを探して録音するターゲットにします。マイク捜索成功とでているので成功です。
Cube をクリックして動かしてみます。

クリックするとしたら、このように録音スタートします。今回のマイクデバイスに向かってしゃべります。Cube をもう一度クリックして録音を終了します。
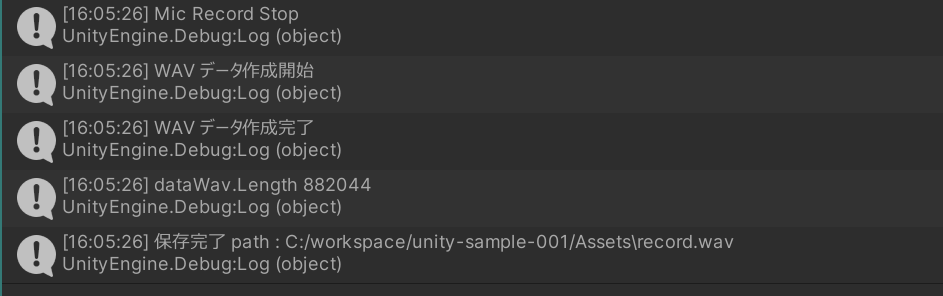
コンソールログがこのように出てきます。WAVE データを作成して今回の Unity の Assets フォルダに record.wav というファイルで保存できました。
うまく録音されていれば、この record.wav を再生すると、録音された内容が再生されます!