M5Stack で MQTT から Node-RED 経由で JSON データでまとめてシナリオを渡してビジュアルが変わる仕組みを作ったメモ
M5Stack で MQTT から Node-RED 経由で JSON データでまとめてシナリオを渡してビジュアルが変わる仕組みを作ったメモです。
背景
https://www.1ft-seabass.jp/memo/2018/05/10/m5stack-meets-nodered-with-mqtt/
こちらの続編です。実はこのネタは弱点があります。
「ネットワークが安定してMQTTがサクサク動けばクラウド(Node-RED)から送ればいいけど、ネットワークが遅延するときにも、ある程度の強度でしっかり複数台協調して動いてほしい」的なことを目指すときに、難しいんですね。
ということで JSON データでまとめてシナリオを渡しさえすれば、秒数がある程度合う形でシナリオ通りに動いてくれると、命令を出す頻度は少なくすることができますし、事前に先々のシナリオを仕込んで順々に文字を出したり、LEDやディスプレイの光り方をうまくやれそうです。
下ごしらえ
前回の記事から色々調べて大きく変わった点があります。
まとめてシナリオを渡してビジュアルが変わる仕組みをM5Stackにやってほしいので ArduinoJSON v6 とか millis 関数とか改めて復習してる。#M5Stack #Arduino #nodered #noderedjp #MQTT pic.twitter.com/6ga58c0CYl
— Tanaka Seigo (@1ft_seabass) October 29, 2020
もともとの記事では millis 関数を回すことで、loop内で気ままにdelayをしても mills でカウントしているタイマーが時間経過を判定している仕組みを引き継ぎます。
JSONのパース。ArduinoJSON v6 で書き方変わってる。 v5 では StaticJsonBufferと JsonObject.parseObject から v6 では StaticJsonDocument 型に格納して deserializeJson を使うようだ。機能に名前がついた感じだ。好み。https://t.co/0w10NnTlX7#M5Stack #Arduino #nodered #noderedjp #MQTT
— Tanaka Seigo (@1ft_seabass) October 29, 2020
今回は ArduinoJson も以前の v5 から最新の v6 を使うようにしました。パースのサンプルコードにある通りで v5 では StaticJsonBufferと JsonObject.parseObject から v6 では StaticJsonDocument 型に格納して deserializeJson を使いました。
Node-RED の仕組み
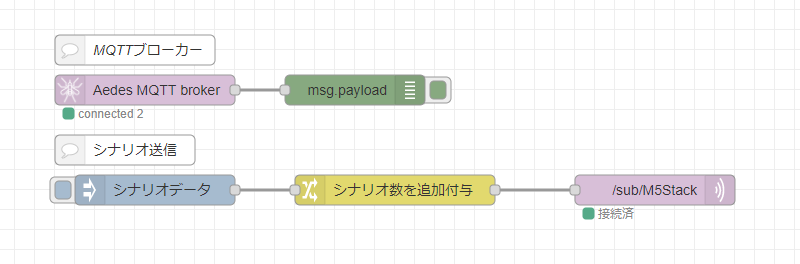
このようなフローになっています。
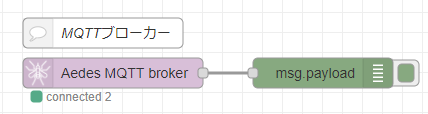
上のフローは、MQTT ブローカーです。 node-red-contrib-mqtt-broker の元となる mosca がArchivedになっていて node-red-contrib-aedes MQTTブローカーノードを見つけた ので node-red-contrib-aedes を使用しています。ブローカーは一つだけ起動していればいいので、複数起動しないように気を付けましょう。

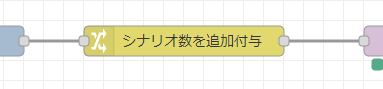
下のフローが M5Stack にデータを送っています。
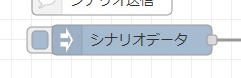
inject ノードに入れているシナリオは以下のようになっています。
ざっくり、type 1 はディスプレイの色と文字を変更します。type 99 は wait で指定されたミリ秒分だけ待ちます。typeは String / char でなく int 型に一旦しました。というのも、M5Stack側で格納する StaticJsonDocument や MQTT 受信時にデータの大きさを BufferSize で決める必要があって、データの量は少ないほうがいいので int 型にしています。
{
    "mode": "multi",
    "senarioLength": 0,
    "senario": [
        {
            "type": 1,
            "r": 0,
            "g": 0,
            "b": 255,
            "message": "blue 0.5sec"
        },
        {
            "type": 99,
            "wait": 500
        },
        {
            "type": 1,
            "r": 0,
            "g": 255,
            "b": 0,
            "message": "green 0.5sec"
        },
        {
            "type": 99,
            "wait": 500
        },
        {
            "type": 1,
            "r": 255,
            "g": 0,
            "b": 0,
            "message": "red 0.5sec"
        },
        {
            "type": 99,
            "wait": 500
        },
        {
            "type": 1,
            "r": 0,
            "g": 0,
            "b": 255,
            "message": "blue 1.0sec"
        },
        {
            "type": 99,
            "wait": 1000
        },
        {
            "type": 1,
            "r": 0,
            "g": 255,
            "b": 0,
            "message": "green 1.0sec"
        },
        {
            "type": 99,
            "wait": 1000
        },
        {
            "type": 1,
            "r": 255,
            "g": 0,
            "b": 0,
            "message": "red 1.0sec"
        },
        {
            "type": 99,
            "wait": 1000
        },
        {
            "type": 1,
            "r": 0,
            "g": 0,
            "b": 255,
            "message": "blue 0.2sec"
        },
        {
            "type": 99,
            "wait": 200
        },
        {
            "type": 1,
            "r": 0,
            "g": 255,
            "b": 0,
            "message": "green 0.2sec"
        },
        {
            "type": 99,
            "wait": 200
        },
        {
            "type": 1,
            "r": 255,
            "g": 0,
            "b": 0,
            "message": "red 0.2sec"
        }
    ]
}
結構シンプルだけど、それでも、10ステップもすると結構なデータの大きさになるので、どこかでちゃんと文字数とか計測してデータ量うを見極める必要はありそうです。
もうひとつ、change ノードでシナリオ数を追加付与してます。
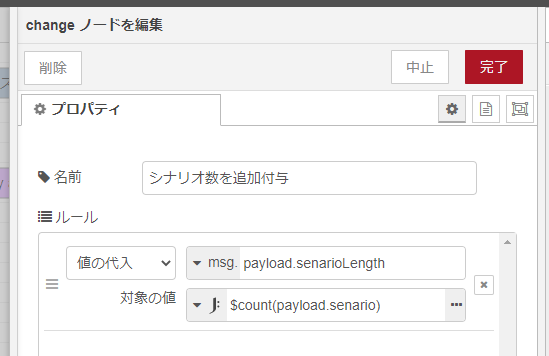
Arduino 側では JSON が扱えるようになるものの、 JavaScriptのように Array.length のようなデータの長さを持っているわけではないので change ノード+JSONata で送る前に senarioLength という値で自動設定するようにしています。
すぐに使えるフローのJSON
フローのJSONはこちらです。
[{"id":"8f98ebb.dace318","type":"aedes broker","z":"c5bdd787.caf958","name":"","mqtt_port":1883,"mqtt_ws_port":null,"cert":"","key":"","certname":"","keyname":"","dburl":"","usetls":false,"x":290,"y":860,"wires":[["55661e9b.76cc9"]]},{"id":"55661e9b.76cc9","type":"debug","z":"c5bdd787.caf958","name":"","active":true,"tosidebar":true,"console":false,"tostatus":false,"complete":"false","statusVal":"","statusType":"auto","x":500,"y":860,"wires":[]},{"id":"12415073.cf1f8","type":"mqtt out","z":"c5bdd787.caf958","name":"","topic":"/sub/M5Stack","qos":"","retain":"","broker":"96750f28.1d725","x":800,"y":960,"wires":[]},{"id":"11e6f5f1.21845a","type":"change","z":"c5bdd787.caf958","name":"シナリオ数を追加付与","rules":[{"t":"set","p":"payload.senarioLength","pt":"msg","to":"$count(payload.senario)","tot":"jsonata"}],"action":"","property":"","from":"","to":"","reg":false,"x":540,"y":960,"wires":[["12415073.cf1f8"]]},{"id":"3afcaa73.7b1f96","type":"inject","z":"c5bdd787.caf958","name":"シナリオデータ","props":[{"p":"payload"},{"p":"topic","vt":"str"}],"repeat":"","crontab":"","once":false,"onceDelay":0.1,"topic":"","payload":"{\"mode\":\"multi\",\"senarioLength\":0,\"senario\":[{\"type\":1,\"r\":0,\"g\":0,\"b\":255,\"message\":\"blue 0.5sec\"},{\"type\":99,\"wait\":500},{\"type\":1,\"r\":0,\"g\":255,\"b\":0,\"message\":\"green 0.5sec\"},{\"type\":99,\"wait\":500},{\"type\":1,\"r\":255,\"g\":0,\"b\":0,\"message\":\"red 0.5sec\"},{\"type\":99,\"wait\":500},{\"type\":1,\"r\":0,\"g\":0,\"b\":255,\"message\":\"blue 1.0sec\"},{\"type\":99,\"wait\":1000},{\"type\":1,\"r\":0,\"g\":255,\"b\":0,\"message\":\"green 1.0sec\"},{\"type\":99,\"wait\":1000},{\"type\":1,\"r\":255,\"g\":0,\"b\":0,\"message\":\"red 1.0sec\"},{\"type\":99,\"wait\":1000},{\"type\":1,\"r\":0,\"g\":0,\"b\":255,\"message\":\"blue 0.2sec\"},{\"type\":99,\"wait\":200},{\"type\":1,\"r\":0,\"g\":255,\"b\":0,\"message\":\"green 0.2sec\"},{\"type\":99,\"wait\":200},{\"type\":1,\"r\":255,\"g\":0,\"b\":0,\"message\":\"red 0.2sec\"}]}","payloadType":"json","x":300,"y":960,"wires":[["11e6f5f1.21845a"]]},{"id":"84557451.eae1e8","type":"comment","z":"c5bdd787.caf958","name":"MQTTブローカー","info":"","x":280,"y":820,"wires":[]},{"id":"e66dcc1.6b8983","type":"comment","z":"c5bdd787.caf958","name":"シナリオ送信","info":"","x":270,"y":920,"wires":[]},{"id":"96750f28.1d725","type":"mqtt-broker","z":"","broker":"127.0.0.1","port":"1883","clientid":"","usetls":false,"compatmode":true,"keepalive":"60","cleansession":true,"birthTopic":"","birthQos":"0","birthPayload":"","willTopic":"","willQos":"0","willPayload":""}]M5Stack の仕組み
ソースコードは以下のとおりです。
#include <WiFiClient.h>
#include <PubSubClient.h>
#include <M5Stack.h>
#include <ArduinoJson.h> // バージョンは v6 で
#include <WiFi.h>
// Wi-FiのSSID
char *ssid = "***** Wi-Fi ssid *****";
// Wi-Fiのパスワード
char *password = "***** Wi-Fi password *****";
// MQTTの接続先のIP
const char *endpoint = "***** MQTT IP *****";
// MQTTのポート
const int port = 1883;
// デバイスID
char *deviceID = "M5Stack"; // デバイスIDは機器ごとにユニークにします
// メッセージを知らせるトピック
char *pubTopic = "/pub/M5Stack";
// メッセージを待つトピック
char *subTopic = "/sub/M5Stack";
////////////////////////////////////////////////////////////////////////////////
WiFiClient httpsClient;
PubSubClient mqttClient(httpsClient);
void setup() {
Serial.begin(115200);
// Initialize the M5Stack object
M5.begin();
// START
M5.Lcd.fillScreen(BLACK);
M5.Lcd.setCursor(10, 10);
M5.Lcd.setTextColor(WHITE);
M5.Lcd.setTextSize(3);
M5.Lcd.printf("START");
// Start WiFi
Serial.println("Connecting to ");
Serial.print(ssid);
WiFi.begin(ssid, password);
while (WiFi.status() != WL_CONNECTED) {
delay(500);
Serial.print(".");
}
// WiFi Connected
Serial.println("\nWiFi Connected.");
M5.Lcd.setCursor(10, 40);
M5.Lcd.setTextColor(WHITE);
M5.Lcd.setTextSize(3);
M5.Lcd.printf("WiFi Connected.");
mqttClient.setServer(endpoint, port);
mqttClient.setCallback(mqttCallback);
// MQTT データの一度に受け取る BufferSize をデフォルトの 128 から 2048 に大幅アップ
// こうすることで、20個くらいのデータを持つ配列を読み込めるようになりました
mqttClient.setBufferSize(2048);
connectMQTT();
}
void connectMQTT() {
while (!mqttClient.connected()) {
if (mqttClient.connect(deviceID)) {
Serial.println("Connected.");
int qos = 0;
mqttClient.subscribe(subTopic, qos);
Serial.println("Subscribed.");
} else {
Serial.print("Failed. Error state=");
Serial.print(mqttClient.state());
// Wait 5 seconds before retrying
delay(5000);
}
}
}
long messageSentAt = 0;
char pubMessage[128];
int launch = 0;
int senarioLength = 0;
int currentSenarioCount = 0;
// ArduinoJson v6 の記述で JSON を格納する StaticJsonDocument を準備
StaticJsonDocument<2048> root;
void mqttCallback (char* topic, byte* payload, unsigned int length) {
String str = "";
Serial.print("Received. topic=");
Serial.println(topic);
for (int i = 0; i < length; i++) {
Serial.print((char)payload[i]);
str += (char)payload[i];
}
Serial.print("\n");
if( launch == 0 ){
// Deserialize the JSON document
DeserializationError error = deserializeJson(root, str);
// Test if parsing succeeds.
if (error) {
Serial.print(F("deserializeJson() failed: "));
Serial.println(error.f_str());
return;
}
// シナリオを動かしだす //////////////
// シナリオに関する値の初期化
currentSenarioCount = 0;
senarioLength = root["senarioLength"];
// launch 値を 1 にして loop が動作をはじめる
// 今回のシナリオ群が完了し 0 になるまで動き続ける
launch = 1;
Serial.print(" senarioLength = ");
Serial.println(senarioLength);
Serial.print(" currentSenarioCount = ");
Serial.println(currentSenarioCount);
}
}
void mqttLoop() {
if (!mqttClient.connected()) {
connectMQTT();
}
mqttClient.loop();
}
// 次のシナリオに関する動作
void nextSenario() {
Serial.print("currentSenarioCount = ");
Serial.println(currentSenarioCount);
if(senarioLength - 1 == currentSenarioCount){
Serial.println("senario finished.");
// 全て完了したら launch フラグを 0 に戻して次のシナリオを受け入れる
launch = 0;
} else {
Serial.println("senario next.");
// 次のシナリオへ行く対応
// currentSenarioCount を 1 つアップさせて配列の次のシナリオを見に行く
currentSenarioCount++;
}
}
void loop() {
// 常にチェックして切断されたら復帰できるように
mqttLoop();
// 100 ミリ秒ごとにチェックする
long now = millis();
long spanTime = now - messageSentAt;
if (spanTime > 100) {
messageSentAt = now;
// 今回のシナリオ群が完了し 0 になるまで動き続ける
if( launch == 1 ){
long type = root["senario"][currentSenarioCount]["type"];
Serial.print("----- type = ");
Serial.println(type);
// シナリオタイプに応じた動作
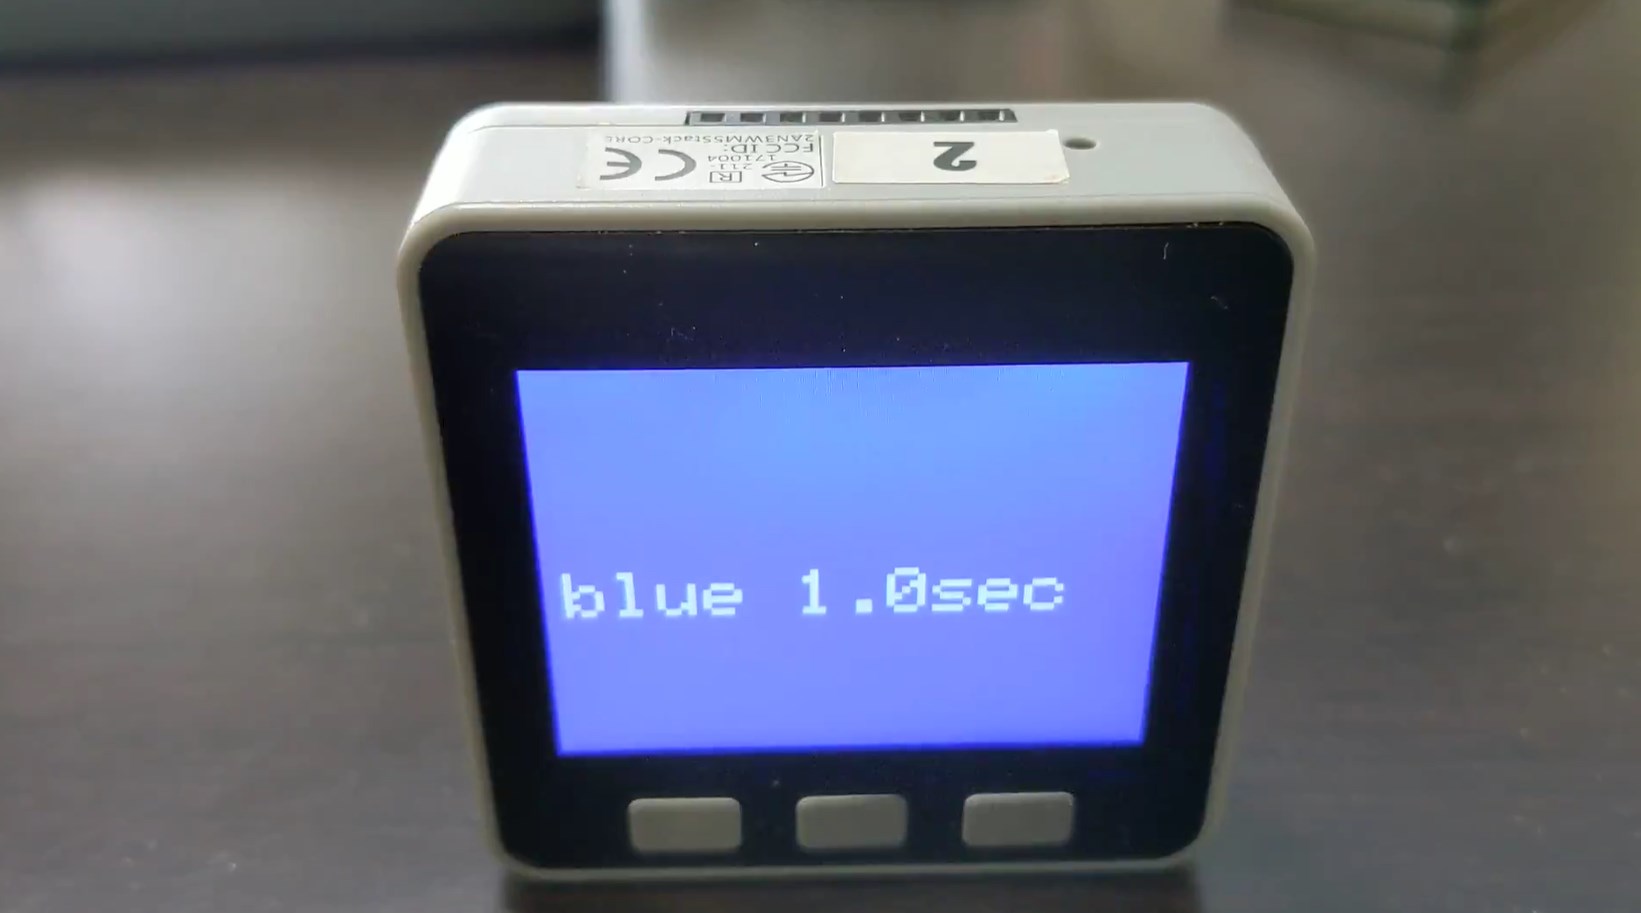
if(type == 1){ // type 1 はディスプレイの色と文字を変更します
// 今回のシナリオ JSON データを取り出す
const char* message = root["senario"][currentSenarioCount]["message"];
long red = root["senario"][currentSenarioCount]["r"];
long green = root["senario"][currentSenarioCount]["g"];
long blue = root["senario"][currentSenarioCount]["b"];
// RGBカラー uint16_t に変換
uint16_t RGB = ((red>>3)<<11) | ((green>>2)<<5) | (blue>>3);
// 背景カラー反映
M5.Lcd.fillRect(0, 0, 320, 240, RGB);
// テキスト反映
M5.Lcd.setCursor(10, 120);
M5.Lcd.setTextColor(WHITE);
M5.Lcd.setTextSize(4);
M5.Lcd.printf(message);
Serial.println("type = color");
Serial.print("red = ");
Serial.print(red);
Serial.print(" green = ");
Serial.print(green);
Serial.print(" blue = ");
Serial.println(blue);
nextSenario();
} else if (type == 99){ // type 99 は wait で指定されたミリ秒分だけ待ちます
// 今回のシナリオ JSON データを取り出す
long t = root["senario"][currentSenarioCount]["wait"];
t = t - spanTime; // 経過した時間分だけ減らす
// 減らして StaticJsonDocument の wait 値に戻す
root["senario"][currentSenarioCount]["wait"] = t;
Serial.print("wait = ");
Serial.print(t);
Serial.println(" msec");
// 経過した時間分だけ減らしつづけて0を下回ったら次のシナリオへ
if(t < 0){
nextSenario();
}
}
}
}
}シナリオ JSON データを取り出すやりかたは、ひとまずこれで
本当は StaticJsonDocument 型を別途用意して、今のシナリオだけ代入して(取り出して)使いたいのですが、まだ把握が追い付いてないので、以下のたいへんにどろくさい書き方にしています。
// 今回のシナリオ JSON データを取り出す
        const char* message = root["senario"][currentSenarioCount]["message"];
        long red = root["senario"][currentSenarioCount]["r"];
        long green = root["senario"][currentSenarioCount]["g"];
        long blue = root["senario"][currentSenarioCount]["b"];
そもそも、Arduino C で JavaScript のように書けているのが、ありがたくも驚いていますが、どこかでStaticJsonDocument 型を別途用意して格納して、可読性を上げれるように頑張ってみます。
とりあえず、今はこれで。
結構大きいデータを受け付けるようにしている
MQTT データの一度に受け取る BufferSize を大きくしたり、
// MQTT データの一度に受け取る BufferSize をデフォルトの 128 から 2048 に大幅アップ
    // こうすることで、20個くらいのデータを持つ配列を読み込めるようになりました
    mqttClient.setBufferSize(2048);
JSON パース後に格納する StaticJsonDocument も 2048 を指定してます。
// ArduinoJson v6 の記述で JSON を格納する StaticJsonDocument を準備
StaticJsonDocument<2048> root;
上記の値と必ずしも一致させる必要はないですが、どちらかの指定が、受け取るデータよりも少ないと、溢れてしまって、サイレントにデータを受け付けていないように見えるので、結構、検証が厄介なので注意しましょう。
実際に動かしてみる
M5Stack に上記ソースを書き込んで、Node-REDから動かしたものがこちらです。
プログラム詳細はブログで詳しく書くとして、M5Stackでまとめてシナリオを渡してビジュアルが変わる仕組みある程度うまくできた~。1.0 秒と 0.5 秒は大丈夫そう。内部は100ミリ秒サイクルだけど 0.2 秒も「0.5秒より」という意味では許容できそうかな。 #M5Stack #Arduino #nodered #noderedjp #MQTT pic.twitter.com/PaYU3C8z4V
— Tanaka Seigo (@1ft_seabass) October 29, 2020
まだまだ、ブラッシュアップしたいポイントはありますが、最低限の目的は達したので一旦まとめました!